Iron on patches are one of the best ways to personalize your gear quickly. People use them on jackets, backpacks, hats, and workwear to give everyday items a simple upgrade. Many Canadians like patches because they add style without needing sewing skills.
Some people still hesitate to use them because they worry about damaging their clothes. A common concern is that too much heat may burn the fabric. Others use very low heat while trying to apply iron on patch pieces, which causes the patch to fall off after a wash.
Good iron on patch instructions help avoid both problems. The right heat, pressure, and timing create a strong bond between the patch and the fabric. This guide explains how to iron on patches properly so they stay secure and your clothes remain safe.
What Are Iron On Patches and How Do They Work?
Iron on patches come with heat-activated adhesive on the back. Heat from the iron melts the glue. Pressure bonds the patch to the fabric.
The adhesive grips fabrics like cotton, denim, and canvas very well. Many Canadian clothing brands use this method for quick badge application on uniforms, outdoor gear, and jackets.
A strong bond needs three things.
- Heat
- Pressure
- Cooling time
These three steps lock the patch in place.
How to Apply Iron in Patches Without Ruining Your Clothes
Follow these iron on patch instructions carefully for the best results.
Step 1: Prepare the Fabric
Start with a clean and flat surface.
Lay the clothing on an ironing board or a solid table. Smooth out wrinkles using the iron first. Heat bonds better to flat fabric.
Remove dust, lint, or moisture from the area where the patch goes.
Step 2: Position the Patch Correctly
Place the patch exactly where it belongs.
Adjust the placement until the patch sits straight. Once heat touches the adhesive, moving the patch becomes difficult.
For jackets or backpacks, check alignment carefully.
Step 3: Set the Right Iron Temperature
Set the iron to a medium or high cotton setting.
Turn off steam. Steam adds moisture and weakens the adhesive bond.
Let the iron heat fully before starting.
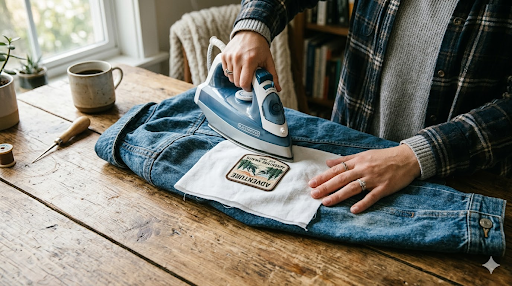
Step 4: Press the Patch with Firm Pressure
Place a thin cotton cloth or baking paper over the patch.
Press the iron firmly on top of the patch. Hold steady pressure for about 20 to 30 seconds.
Lift the iron. Press again across the entire patch area. Edges need strong pressure to seal properly.
This step completes the core process to apply iron on patch pieces securely.
Step 5: Let the Patch Cool Completely
Cooling helps the adhesive harden.
Leave the fabric flat for several minutes. Avoid touching the patch during this stage.
The patch becomes fully secure once the glue cools.
Where You Can Use Iron On Patches
Iron on patches work on many everyday items. People across Canada use them to add style, repair fabric, or show team and brand identity.
The table below lists common items where patches stick well and why people use them.
| Item | How Iron On Patches Are Used |
| Jackets | Denim jackets and bomber jackets remain a popular surface for patches. Motorcycle clubs, travel groups, and hockey teams often decorate jackets with badges and custom designs. |
| Jeans | Patches cover small tears in denim while adding personality and colour to everyday clothing. |
| Backpacks | Students across Canada place patches from travel, events, and favourite brands on backpacks. |
| Hats | Some cotton caps accept iron on patches well and add a custom look to casual wear. |
| Work Uniforms | Tradespeople, delivery drivers, and small businesses use patches to display company logos and team identity. |
Tips to Make Iron On Patches Last Longer
A few habits keep patches secure for years.
- Use strong pressure during ironing.
- Focus extra heat around patch edges.
- Let the patch cool before moving the fabric.
- Wash clothing inside out to reduce friction.
- Use cold or warm water during washing.
These small steps protect the adhesive bond.
FAQs
Can you iron patches on polyester?
Yes, polyester blends usually handle iron on patches quite well. Use medium heat and steady pressure so the adhesive melts properly. Very high heat can damage the fabric, so keep the temperature moderate.
How long should you iron a patch?
Most patches need about 20 to 30 seconds of firm pressure from the iron. Hold the iron steady over the patch and make sure the edges receive enough heat so the adhesive bonds evenly.
Why are my patches peeling off?
Peeling usually happens when the patch did not receive enough heat or pressure during application. Steam from the iron can also weaken the adhesive. A quick re-press with dry heat and strong pressure often fixes the problem.
Can iron on patches be removed?
Yes, removal stays fairly simple. Heat from a warm iron softens the adhesive on the back of the patch. Once the glue loosens, the patch can be gently lifted away from the fabric.
Buy Custom Iron On Patches from Patch Makers Canada
Custom patches add personality to clothing, gear, and uniforms. Businesses, clubs, and creative brands across Canada use patches to build identity.
Patch Makers Canada produces high-quality custom patches designed for easy application. Every patch includes strong adhesive backing that supports simple iron on patch instructions and long-lasting results.
From jackets and backpacks to uniforms and promotional merchandise, custom patches bring colour, branding, and character to everyday gear.