
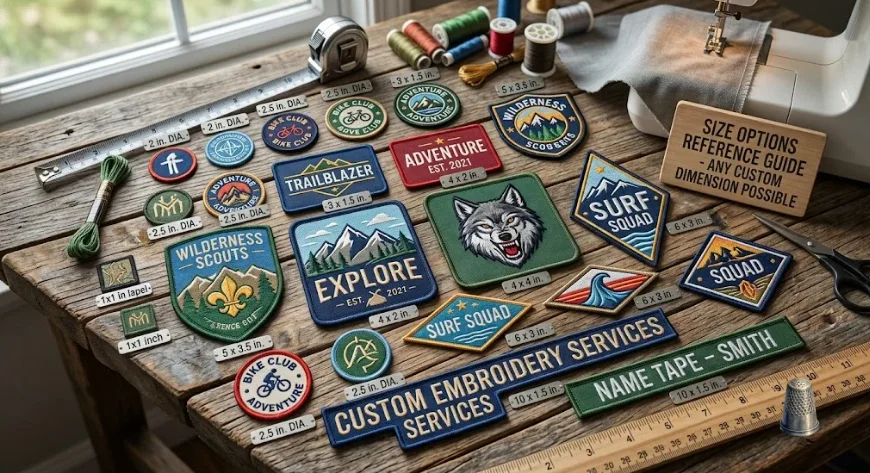
Choosing your artwork is the fun part. Choosing your custom patch size is the part that actually determines whether that artwork looks sharp on the finished garment or gets lost the moment someone steps back three feet.
It is easy to spend weeks refining a logo and then pick a patch size in the final five minutes of the order form, almost as an afterthought. That afterthought matters more than most buyers expect.
Size affects how readable your design is from across a room, how the patch sits on a toque, jacket, or work shirt, how comfortable it feels once it is stitched or ironed on, and how much the finished order costs per piece.
Get it right and the patch looks like it was always meant to be there. Get it wrong, and even a great design can look like an oversized sticker or a logo that disappeared. This guide walks through custom patch sizing the way our team at Patch Makers CA actually guides customers through it.
Start with where the patch is going; match the size to that placement and the garment fabric; then fine-tune based on patch style and budget. Along the way, we have included both inch and centimetre measurements, since Canadian buyers often work in metric even though the patch industry itself still runs on inches.
Why Custom Patch Size Deserves Its Own Decision
Most people treat patch size as a formality, something to fill in on a quote form after the design is locked. In practice, size is one of the few decisions that touches every other part of the order.
It Determines Whether the Design Actually Reads
Detailed artwork, small text, and fine linework need physical room to survive the embroidery or PVC moulding process. A crest with a motto underneath it needs more surface area than a single bold letter. As a rough rule, anything with text smaller than about a quarter inch tall risks turning into a blur once it is stitched, no matter how crisp the vector file looked on screen.
It Determines Comfort and Fit
A patch that is proportionally too large for the garment feels stiff, catches on things, and can pull at the fabric around it, especially on lighter materials like fleece or performance wear. A patch that is too small on a heavy garment, like a wool car coat or a canvas work jacket, can look like an afterthought rather than a design choice.
It Determines Cost Per Piece
Patch pricing scales with material and stitch count, so a larger patch always costs more than a smaller one using the same artwork and style. Locking in the right size early keeps your budget predictable across a full production run instead of discovering a price jump after the first proof.
If you want a full breakdown of what drives patch pricing beyond size, our pricing page walks through the other cost factors like style, backing, and quantity.
Start With Placement: Where Is the Patch Actually Going?
Placement should decide your patch size chart before style or budget enters the conversation. Here is how the standard placements break down, in inches with centimetre equivalents for reference.
Hats, Toques, and Front Panels
Structured caps and trucker hats have a narrow curved panel to work with, so oversized patches tend to wrap awkwardly around the seams.
- Standard hat patch size: 2 to 2.75 inches tall (about 5 to 7 cm), 3 to 3.5 inches wide (about 7.5 to 9 cm)
- Leather or PVC hat patches: commonly 2 x 3 inches (5 x 7.5 cm)
- Anything taller than 3 inches on a structured cap tends to look oversized unless the design is intentionally bold and streetwear-inspired
Knit toques and beanies, popular across most of the country for a good chunk of the year, generally take a smaller front patch than a structured cap, often in the 2 to 2.5 inch range, since the knit fabric has less flat surface area to work with.
Left Chest, Shirts, and Corporate Wear
This is the most common placement for brand and team logos.
- Height: 2.5 to 3.5 inches (6.5 to 9 cm)
- Width: 3 to 4 inches (7.5 to 10 cm)
- Sleeve placements typically run smaller, around 2 to 2.5 inches round (5 to 6.5 cm)
Jacket Backs and Statement Pieces
Back patches for motorcycle vests, denim jackets, or team outerwear carry the whole visual story, so they run much larger.
- Common back patch size: 10 to 12 inches tall (25 to 30 cm), sometimes paired with smaller rocker patches above or below
- Large front or sleeve statement patches for bomber jackets and coats: 8 to 12 inches (20 to 30 cm) depending on the garment size
Uniforms, Tactical Gear, and Name Tapes
Uniform and tactical patches tend to follow tighter, more standardized sizing so they stay compatible with existing gear and Velcro mounts.
- Name tapes: about 4 x 1 inches (10 x 2.5 cm)
- Morale and unit patches: 3 x 2 inches or 3 inch round (7.5 x 5 cm, or 7.5 cm round)
- Velcro-backed tactical patches: 3 x 2 inches or 3.5 x 2 inches (7.5 to 9 cm x 5 cm)
For anyone building out custom military patches or duty gear, our custom military patches page covers Velcro backing options that pair with these standard sizes.
Events, Merch Drops, and Promotional Patches
For giveaways, festival merch, and general branding where the patch needs to photograph well and fit on multiple garment types, most brands land in the 3 to 3.5 inch range (7.5 to 9 cm). It is large enough to carry a full logo and small enough to work on a hat, a bag, or a sleeve without a redesign.
Match the Size to the Fabric, Not Just the Garment Type
A 4-inch patch behaves very differently depending on what it is going onto. This matters more in Canada than it might elsewhere, given how much of the country layers heavy outerwear for a large part of the year.
- Heavy fabrics such as denim, canvas work jackets, wool coats, and leather can comfortably carry larger patches, 4 inches and up, without sagging or pulling at the stitching.
- Lightweight fabrics such as performance tees, thin fleece, and moisture-wicking athletic wear hold up better with smaller patches, generally 3 inches or under on the chest, so the patch does not stiffen or distort the garment.
- Mid-weight fabrics like hoodies and crewnecks sit comfortably in the middle, handling 3 to 4-inch patches without issue as long as the backing type suits the fabric.
Backing type also changes how a given size behaves. Iron-on backing works well for mid-sized patches on hoodies and kidswear, but very large iron-on patches can peel or feel stiff on flexible fabric.
Sew-on backing is the more durable choice for large back patches and permanent placements on heavier garments. If you need further details, see our guide on the comparison between iron-on patches and sew-on patches.
Hook and loop patches, also called Velcro, need enough surface contact area to stay secure, so keep those patches within the 2- to 4-inch range recommended above. Not sure which backing suits your garment and size combination? Contact us to get a free quote, and our team will recommend the right pairing before production starts.
How Patch Style Changes the Size Conversation
Not every patch style performs the same way at every size. Choosing the wrong combination is a common and avoidable mistake.
Embroidered Patches
The classic choice, and the most size-flexible. Custom embroidered patches handle logos, text, and simple icons well anywhere from 2 to 5 inches. Fine text and thin linework need to stay on the larger end of that range so individual stitches do not blur together.
Chenille Patches
Fluffy, bold, and built for impact rather than fine detail. Custom chenille patches work best at 4 inches and up, on varsity jackets, letterman-style pieces, and bold lettering. They are not the right choice for small or text-heavy designs.
Leather Patches
Clean and upscale, ideal for hats and denim. Custom leather patches hold their impact best in the 2 x 3 inch range. Too small and the etched or debossed detail loses definition. Too large on a hat, and the proportions feel off.
PVC Patches
Waterproof and durable, a strong pick for outdoor and tactical use. Custom PVC patches hold detail well at 2 to 4 inches for gear and tactical applications, or 3 to 3.5 inches for logo work on bags and caps.
Woven Patches
Best suited to smaller sizes with fine text and detailed artwork, since the tighter thread structure of custom woven patches preserves detail that embroidery would lose at the same scale.
A Simple Formula for Estimating Patch Size
If you are staring at a blank width and height field on a quote form, this rough formula helps put a single number to a patch:
Average patch size = (height + width) ÷ 2
It will not replace an actual proof, but it gives you a quick way to compare patches across a size chart or communicate a rough size to a teammate before the design team gets involved.
How to Brief Your Patch Maker So Sizing Is Right the First Time
The fastest way to avoid a resize after proofing is to hand over clear specifications up front. Share:
- Exact dimensions you are considering, for example, a 3-inch circle or a 2 x 3.5-inch rectangle
- Placement, whether that is a hat front, left chest, jacket back, or sleeve
- Patch style, whether embroidered, PVC, woven, chenille, or leather
- Garment fabric and weight, especially for lightweight or performance materials
- Use case, whether it is uniforms, a merch drop, an event giveaway, or team gear
Patch Makers CA includes a free digital proof with every order, so even if you are unsure on sizing, our team will mock up your design at a couple of size options before anything goes into production. Minimum order quantity is just 10 pieces, so testing a size on a small run before committing to a bulk order is a realistic option.
Frequently Asked Questions
What is the most common custom patch size?
For general branding and logo work, most orders land in the 3 to 3.5 inch range (about 7.5 to 9 cm). That size is large enough to keep text and detail readable while still being versatile enough to work on hats, hoodies, jackets, and bags without a redesign. It is the size we recommend most often when a customer does not yet have a specific placement in mind, since it performs well across the widest range of garments and gives the design team room to preserve fine detail during digitizing.
What size patch should I use on a hat?
A safe standard is 2 to 2.75 inches tall and 3 to 3.5 inches wide (roughly 5 to 7 cm by 7.5 to 9 cm) for structured caps and trucker hats. This range fits comfortably within the front panel without wrapping into the curved seams on the sides. For knit toques and beanies, sizing down slightly, closer to 2 to 2.5 inches, tends to sit better on the flatter but smaller front surface those garments offer.
Can I make my patch smaller to save money?
Yes, smaller patches generally cost less per piece since they use less material and fewer stitches, but there is a floor below which fine detail and small text stop reading clearly. Rather than shrinking a design that was built for a larger size, it is usually better to simplify the artwork itself, removing fine linework or condensing text, so the smaller patch stays legible instead of becoming a blurry version of the original design.
Do you offer patch sizes in centimetres for Canadian orders?
Yes. While the patch industry as a whole, including production equipment and standard size charts, is built around inch measurements, our team is glad to work in centimetres if that is easier for your team internally. Just note your preferred unit when you request a quote, and we will size the digital proof accordingly so what you approve matches what you expect to receive.
Get Your Patch Sized Right Before You Order
The ideal size for a custom patch is not a single number. It is the size that fits your placement, suits your fabric, keeps your artwork legible, and works within your budget, and that combination looks different for a chest logo than it does for a jacket back or a hat front. Patch Makers Canada takes the custom patch size very seriously.
Starting with placement, checking it against the garment fabric, and then adjusting for patch style will get most orders to the right dimensions before a single stitch goes down.
If you are still not sure where your design lands, that is exactly what a free digital proof is for. Talk to our team, and we will size your artwork correctly the first time, so your finished custom patches look intentional, not improvised.